

Fitting rear subframe brace, tie bar & lca for Acura rsx, Integra DC5, Civic EP3 EP2
This is a complete guide on how to fit the rear subframe kit, tie bar and lower control arms for Acura RSX & Integra DC5 Type R available here, the same process also applys to the civic ep3 ep2 kit you can get the ep civic kit here.
Each kit includes
-
Lower Control Arms: Made from lightweight 6061 T-6 Billet Aluminium, these arms are 25% lighter than OEM. They improve agility, offer quicker steering response, and ensure precise control, making them an essential upgrade.
-
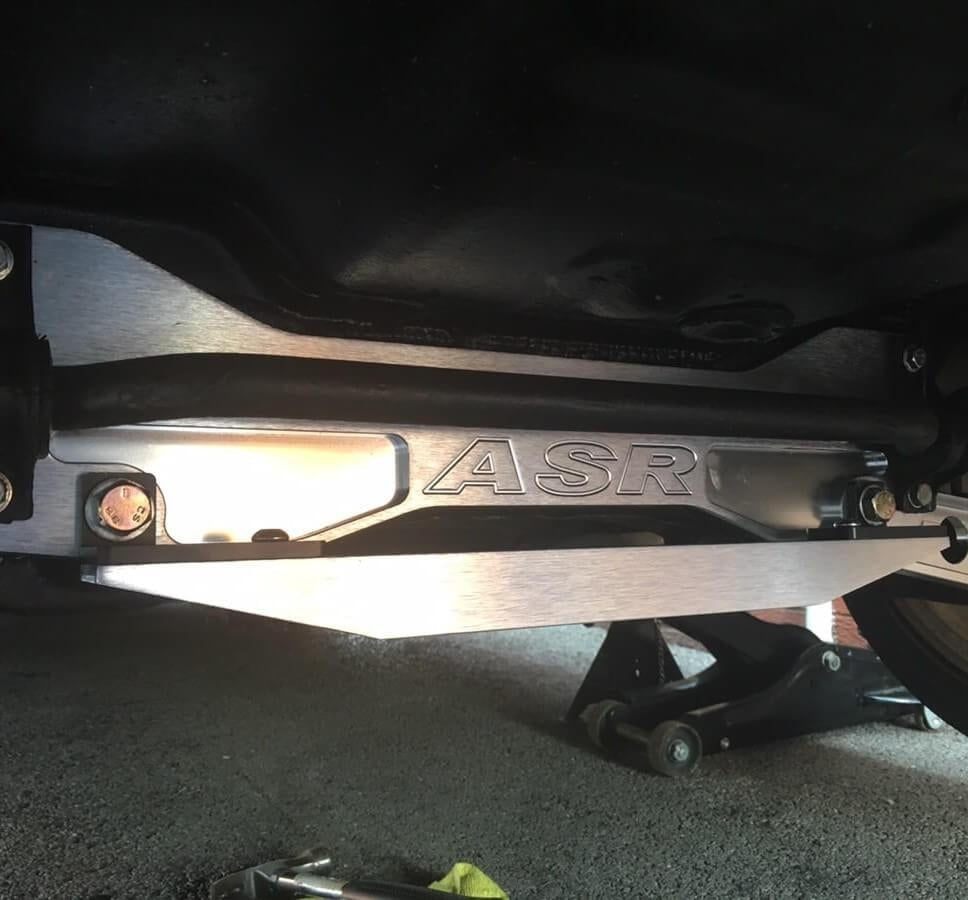
Subframe Brace: This brace, also crafted from 6061 T-6 Billet Aluminium, reinforces the OEM rear subframe. It prevents tearing from large-diameter sway bars, enhancing stability and minimizing flex.
-
Tie Bar: Enhance torsional rigidity and suspension alignment with the Beaks Bar. Made from high-quality anodized 6061 T-6 billet aluminium, it boosts handling performance and aesthetics.
- All bolts, fixtures needed for fitment and special 10 point socket is included to remove your control arms.
For the Lower Control Arms installation, please use OEM spline bolts.
Colours available are red, blue, silver, gold, purple and black.

Tools needed
- jack and stands
- 17mm socket
- 18mm socket
- Torque wrench
- 12mm socket
- 13mm socket
- Drill bit (I will confirm the size)
- Washers x2 (will conform the size)
- Optional planks of wood

I began by detaching the anti-roll bar bolts, which are 12mm in size. Make a note of the bracket's orientation for later reassembly. After removing the bracket, slide the rubber bush down and away from the ARB.


Now pick a side to start from and remove the 3 bolts near to the wheel, you will need the 10 point socket for this

After removing the three bolts, the OEM LCA will dangle. You can then take out the lone bolt on the subframe securing it, which is 17mm. Follow the same procedure for the opposite side.


Now that the OEM components are out of the way, it's time to fit the new parts. Start with the longest bolts (x2), the spacers (x2), and the ASR Subframe brace.
Apologies, I had a visual guide prepared, but it seems there's an upload issue.
Regardless, position the ASR brace appropriately. While holding it, take one spacer and one bolt. The spacer should sit behind the brace at the spot from which the single elongated bolt was removed, specifically at the two lowest points. Slot the spacer and then thread the bolt a few turns to secure the brace with the spacers. Repeat for the other side.
At this point, the brace should be affixed with a spacer on either side. It's time to reattach the ARB. Using the 4 new bolts you procured separately from the kit and a 13mm socket, secure the ARB. Begin with the bottom bolt, threading it halfway, followed by the top ones. Ensure an even tightness across all the bolts.

Let's move on to the rear Lower Control Arms (LCAs):
-
Preparation: Gather the right LCA for the side you're working on, the new set of 3 bolts, and the metal plate with 3 holes. You'll also need the 10-point socket.
-
Bracket Bolt Removal: Detach the long bolt from the ASR brace. The spacer should remain in its place, although it might shift slightly. Don't worry; it's easy to realign.
-
Installing LCAs: Position the LCA approximately where it needs to go. Prioritize attaching with the 3 bolts, NOT the single one. Tighten them nearly all the way, leaving just a tiny gap between the bolt heads and the metal.
-
Proceed or Pivot: You can choose to complete one side entirely or do both sides step by step.
-
Tie Bar Adjustment: Retrieve your tie bar and drill. The pre-existing holes in the tie bar won't accommodate the bolt, unfortunately. To ensure stability while enlarging the holes, tighten the brackets onto the tie bar. Once secured, drill the holes to a size that will comfortably fit the bolts.
By following these steps, you'll successfully mount the rear LCAs and prepare the tie bar for attachment.

Once both LCAs are secured:
-
Bracket Removal: Detach the brackets from the tie bar.
-
Long Bolt Installation: Prepare to insert the lengthy bolts. For each, add a washer and the respective bracket for the side you're addressing. Aligning the holes can be a bit tricky; you'll need to adjust the LCA by pushing it upwards and maneuvering it to get everything to match up. I found laying on my back and using one hand to guide the bolt and the other to position the LCA worked best. It's a task made easier with an extra pair of hands, but it's doable solo – as I can attest!
-
Bolt Securing: Tighten the bolts sufficiently so the bracket remains adjustable but isn't too wobbly.
-
Lower Tie Bar Attachment: With both LCAs set, it's time to mount the lower tie bar. Ensure you're inserting your bolts into the innermost holes.
This step-by-step method ensures both your LCAs and the tie bar are securely in place, ready for the road or track.

Proceed to attach the rear tie bar. Once in position, secure it by tightening the two bolts. This will ensure stability and proper alignment.

-
Outer Bolts: These will be secured last.
-
Tighten Side Bolts: Ensure you tighten the three bolts on each side of the tie bar. Based on research, the recommended torque setting for these is:
- 93 ft lbs (or 126 Nm).
-
Last Long Bolt: Address the remaining long 18mm bolt. It's crucial to only lightly tighten it at this point. Do not fully torque it while the car is elevated. There have been instances of bush twisting when the car is lowered if this bolt is torqued in the air.
-
Lowering the Car: Once you've ensured all other bolts are secured, it's time to bring your car down. For added safety and to maintain some under-car accessibility, position a wooden plank under each rear wheel.
Remember, the last step will be to torque the 18mm bolts when the car is resting on its wheels to ensure optimal alignment and prevent potential bushing issues.


Alright, here's the final stretch:
-
18mm Bolts Torque: With your car grounded, torque the 18mm bolts to the specific setting:
- 43 ft lbs (or 58 Nm).
-
Lower Tie Bar Bolts: Once you've ensured the correct torque on the 18mm bolts, go ahead and secure the last two bolts on the lower tie bar.
And just like that, you're finished! It's always a rewarding feeling to complete such tasks. Taking your car out for a spin, you might notice a stiffer feel to the rear – a testament to your hard work. Whether you did this upgrade for aesthetics or performance, the results are sure to please. Enjoy your improved ride!
